How to Use Photoshop for Designing Display Ads
If you are designing your own display and social media ads, I’m sure you’ve spent your fair share of time creating and working in separate Photoshop documents for each individual ad size. For example, if you are working with our G.I. Jobs and Military Spouse Ad Ops team, you’ve most likely submitted at least 2 different image sizes for your social media ads, and an additional 6 ad sizes if you are running native and display advertising for your business or franchise.
If you’re designing ads for GDN, there’s an additional 6 ad sizes you can use, bringing the total to a possible 14 different display ad sizes. And that only covers the basic ad sizes.
So today, I am going to walk you through how to use the VIQTORY Display Ad Photoshop Template instead of building and swapping between 14 different PSD files.
Maximum Your Display Ad Design Productivity
Follow Along Directions
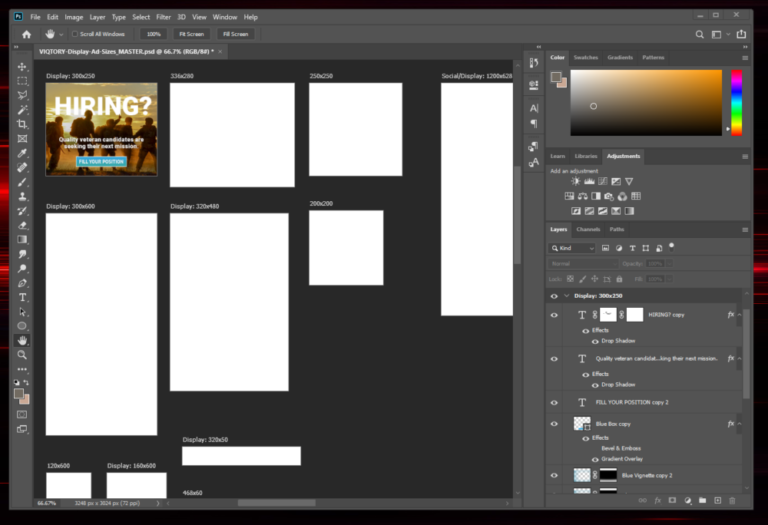
Step 1: Open the Photoshop Template
It looks a little intimidating at first, but once you get in there, it’s not so bad. Each of the VIQTORY programmatic image sizes has it’s own artboard which includes social ad sizes. We’ve also included an additional 6 artboards for your Google Display Network ads.
Step 2: Build Your First Ad
I prefer to build the ads in phases – based on size and shape. I typically start with 300×250 and move on to similarly shaped and sized artboards from there. I’ve found this to be one of the easier sizes to start with.
Something to keep in mind – when sizing images and graphics larger than their original size (that are not vector graphics), they will distort, look fuzzy, grainy, bitmapped. Take your pic. It’s important to remember that any image/graphic you bring in will need to be bigger than the artboards themselves, to preserve quality. Fine for sizing down, but not up.
Once you have all of your ad elements in place, you’ll have something that looks like this.
Step 3: Select the Ad Elements
To move all of your elements to the next artboard, first select your Move tool by pressing V, or selecting it on your tools panel.
Select all of the elements within the artboard by dragging the bounding box around the artboard, or by selecting all of the layers in the layers window.
Step 4: Copy the Ad Elements
Then hold the Alt key if you are working in Windows, or the Option key for Mac, and just drag your ad elements to the next artboard.
I’ve actually found you’ll run into fewer issues if you drag your layers using the layers window. There’s less of a chance of the elements winding up on the wrong artboard.

Step 5: Resize the Ad Elements
Next, you will need to resize and possibly reposition your ad elements to fit the artboard properly. For artboards that are similar in shape and size, this can be quick and easy. You might just need to resize your entire selection to fit the artboard. You can use ctrl + t on windows, or cmd t on a mac to resize and move all of the elements as a group. If you need to move or resize an individual layer, select it and move or resize it from there.
As you move on to the skyscraper and banner ads, you’ll find this process to be a little trickier. You will have to be a little more creative with your positioning – which is why I suggest staying with similarly shaped ads. Having layered elements is also important when building out all of the ad sizes and shapes. Individual layers can be easily repositioned or turned off altogether.
Step 6: Repeat Steps 3 & 4
Continue building your artboards by copying and repositioning the elements as needed. Skip the artboard sizes that you won’t need or aren’t required for your campaign.

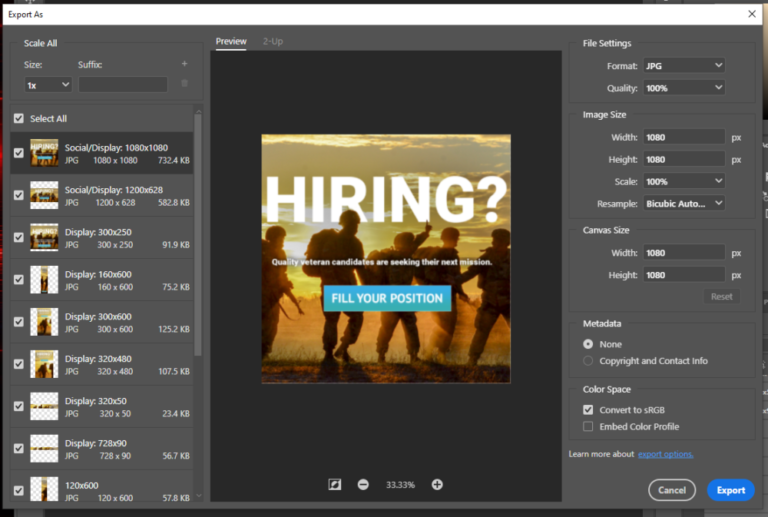
Step 7: Export the Artboards
Finally, you’ll need to select all your artboards to export as flat image files. You will want to collapse all of your artboard layers back into their artboard folders and select them all there.
Then, right click on the selected artboards within the layers tab and select “Export As…”
It will bring you to a screen like this, where you can adjust the image quality and file type for each size before saving them out. Remember, Google Ads only accepts files that are 150kb (kilobytes) or smaller!
When you click the “Export All” button on this menu, it will let you select a place to save your new files. I would recommend making a new folder to save out your images. Once you click the final “Export,” it will save all your artboards, named according to their dimensions and ready to be uploaded to your campaigns!